Pages

Friday, January 29, 2010

Totally Unexpected

Well my dears, sorry to have dropped off the planet like that!  Seems that finding time in one's schedule to pass two kindey stones becomes harder and harder to find until one day no matter how you try to put it off it just happens!  OUCH! ( and yes, just like childbirth, they are not lying and you can take it from me.. I have had 6 children, 4 of them with no drugs.. yep..hurts just like childbirth)


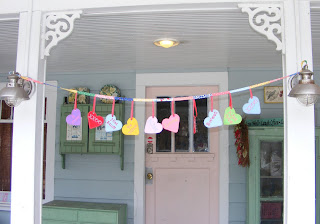
As of tonight I have filled all the orders for the  Conversation heart banners and am totally excited to see what you do with them. So far I hear that one is going to be used to surprise a husband at work and another is going to be used as part of the decor for a Kidgergarden V-day party. A couple of you plan to use them as package dangles and others of you are just compulsive Fresh Thread Shoppers ( you know who you are and you know I love you!)

Here in Chattanooga we have gotten and honest to goodness snow that has slammed the city to a stop so I have lots of time this weekend to work on a new idea... or clean house
....hmmmmmmmmm. Let's think on that shall we?

Much love to all,  The Girl with the stone-less kidneys!

Wednesday, January 27, 2010

Sneak Attack


For less than a fancy card that will end up in the recycle bin in a week you can surprise someone you care about with a " sneak-attack" of love. I have big plans this year and have lots of hearts ready for more banners to make for those who are special to me. ( Luckily for me none of them do embroidery so they will not see this!) This is a fast project since each heart takes less than 5 minutes to sew out and there are no color changes!

But maybe you are REALLLLLLY short of time.. just make a single heart, put it on a pretty ribbon loop and then hang it on a door knob where someone you know will find it. Even better, sneak over to the house of an older person in your neighborhood.. and leave them a little love.

If you have a bunch of little people in your house, have a Valentine's Heart Hunt. Make up a bunch of the hearts but don't punch them or string them up, just hide them here and there and make sure to have treats to give out when the hearts are found! Little children love this!

Sunday, January 24, 2010

Hybrid Happiness


Hybrid cars, hybrid scrapbooking and now hybrid embroidery!
We all know that embroidery machines are wonderful things but at times they can distance us from the satisfaction of  handmade projects. So let's let the machine do what it does best and then we add our talents to the rest!

Join me over the next couple months as I introduce hybrid embroidery projects that take the best of embroidery machine technology and combine it with traditional needle arts to create one of a kind projects that you will be proud to call your own or sell in your craft show booth.

To kick things off I have a small  freebie for you!
Perfect for a small token of your affection the Heart's Desire Pin is the perfect small project to combine machine embroidery and hand stitching for a charming gift that is sure to garner much admiration.


Easy to make a fun to give!


Friday, January 22, 2010

Party Hats for Everyone!


"Mommy, you are going to be a math fact tomorrow"... "Huh?- said I"   " yes.. 6x7 is 42!"

 " Wow honey... sobering great use for math!"


It's my birthday but you my dear guest get the gift.
 For this very sort little weekend most* of the store is 50% off!

I will be gone most of Saturday but will fill all orders soon as I return home that night.
** Take a Peek Mirrors and The Lovie Charity collection are not included in the sale.

The party is over till next year, hope all of you enjoyed the great deals!

Wednesday, January 20, 2010


Hello all you wonderful people!.. I hope that you are doing great and that life is divine.
I thought I would take a moment to dive into my mail bag and answer a question I get rather often.

Dear Maddie, I have an embroidery machine and people are asking me to monogram things and I don't know what to charge! Signed, All knoted up


Dear Knoted, This can be a good thing, but your first decision is if you really want to be embroidering for others. While it can be nice for a bit of extra change in your pocket it can also be stressful to worry about messing up something that is not your own. ( yes at some point this will happen.. so you need to learn to prepare for it) But just for kicks let's say you are the plucky sort and have decide that you do want to do it... you are still stuck with how much to charge.

There are a lot of formulas out there as to how to figure this out...go ahead, Google them.. I can wait............. ah.. ok... more confused than ever? Yep.. dollars per 1000 stitches, thread changes, stabilizer cost.. yikes!


 SO here is my highly unscientific method for figuring what to charge..
How much do you want to make per hour... (yes of course you want to make $100 per hour..but realllly) Let's say $20, for example. So now.. how long will it take you to do a design set up, hoop and stitch out the given name or design.. lets say 5 mins to set the lettering, 5 mins. to hoop and 12 minutes to stitch out the monogram. Total of 22 minutes. At $20 per hour 22 minutes would make you about $7.26 ( round that up to 7.50) ( for the math impaired... $20 and hour is about 33 cents per minute.. take 33 cents times 22 to get your number)

For me it works out this way.. I know that some things are hard to hoop ( flap on a very popular gym bag that I wish would fall off the earth!) so I say they need 10 mins of hooping, some are easy, pillow fronts ( 5 mins), the minutes to stitch comes from the data I get from my machine or my software. In my case if there are over 6 colors I charge a color change charge but that is up to each person. All of these numbers get thrown together and from there I get my total.
 
 Now after a while you will know certain amounts.. like how much a 3 letter monogram on a towel will cost, but until you do, do the math each time, keep track and check back here for a little sheet I am going to post up for just this very purpose. Oh.. and feel free to ask any other questions you have!

Sunday, January 17, 2010

Stitch Recipe Cards - Free Printable


I have been having a wonderful time playing with my new Bernina 830.  Now that she is all fixed up she has been sewing like a dream!  Lots (1000's) of stitch combinations to play around with but not near enough room in my head to remember them all!

 I had to come up with a way to remember all the " ingredents" in each stitch-combi so " recipe cards" seemed like the perfect way to keep all that information easily at hand. Now I can just pull what  I need and take it to the machine  for easy reference when working on a project.

I thought you might like this idea so am sharing the cards I created with you!   These print 4 to a sheet, so it's easy to cut them apart and you are ready to go!  The file is a PDF and I highly suggest printing on  your best print setting and using quality card stock for the job.

Thursday, January 14, 2010

Taming the Sock Monster- sock bag tutorial and free design


Money tight but want to do a quick fun project that has the added benifit of making your house neater and laundry easier to do?... well come on!


In a family with as many children as we have sorting socks can take on a mythical proportions and become all but undoable when the sock monster becomes involved. Missing socks are the bane of my existence, but no more! This week at Target I ran into a colorful assortment of mesh laundry bags for a mere $1 each! These were larger than I needed but at $1 the price was right. ( Look for them in the Target Dollar Spot in the front of the store)


Since they were so big I decided to cut off 1/2 the length of the bag and bind the end with double fold bias tape for added strength but of course you would not really have to do this and if you did you could just serge the bottom shut.


Then it was time to put the bag in the hoop. So first hoop a piece of TEAR -AWAY ( believe me).. then use a bit of spray adhesive or pin the front center of the bag in place. The put down ANOTHER layer of tear away and then the fabric you are going to use for the applique.


Take the whole thing to the machine and run the first step which is a single running stitch. When that is done trim away the excess fabric but LEAVE the TEAR AWAY in place ( the tear-away serves two functions here, one to add more stability and second to protect the mesh fabric as you trim away the extra fabric)

Run the zig-zag and then the satin stitch and proceed with the rest of the lettering.


When done remove from hoop and pull the tear away from the design ( Hint: pull in the directly opposite direction of where the tear-away is stitched.. do not pull back over the stitching so that you do not distort the satin stitching.


Easy huh?
Want the design file?

Button, button who's got the Button..Mirror!

Just a quick update,  after a slightly frantic search through the stock drawers the boys found set ups for 13 more Take a Peek Mirrors so if you want one hustle on over to the the Fresh Thread store and scoop them up.

We are putting a hold on our wholesale shipments until we get more supplies in.  But current stock will keep shipping as normal and wholesale orders will ship next week. ( As a small  ~ sorry~ to our wholesale customers we are going to be dropping in an extra Take a Peek for being so supportive and understanding)

Wednesday, January 13, 2010

Ho he ho...it's off to work we go!


The Button Boys send their thanks to all who have placed orders in this past week. They have been busy filling the  Take a Peek orders along with other business.

They are currently still shipping 3x's a week for regular orders and the wholesale orders are going out 2x a week. Average turn around time seems to be about 2 days and then three days shipping to most U.S. locations.  The boys have switched to using mylar covered fabric  ( new and vintage) for  the newer buttons beacuse " it looks so cool" to quote the elder button boy!

If you have any questions feel free to drop the boys a line or leave a note here on the blog. The Button Boys do have a website  and you can access it by clicking  HERE

If you need a Take a Peek Mirror of you own you can click the link at the top of the page on the right hand side.

PLEASE NOTE:  After two really large wholesale orders the boys are sold out until the new shipment of supplies arrives. We expect it middle of the week of the 18th. We are still taking orders but mirrors will not go out until late in the week of the 18th or early in the week of the 25th.

Saturday, January 9, 2010

Sweet Tooth...for your little sweetie


Come take a peek at my design board.
This  design came from a sketch I did when working on the art for Toothy-The Little Pillow. It was not quite right for that project but I kept coming back to it and it just made me a smile each time I would find it on my desk ( yes my sketching desk could use a bit of a clean up!) .   Given a bit of time the other day I decided to bring this sweet little tooth to embroidery life and offer it as a free design.  Here I stitched the design on a piece of glittery polar fleece* and then with my regular machine I zigzaged it to the onsie.
 The actual stitch file is just the little tooth and the wording.  
  I can't think of a cuter way  to celebrate baby's first tooth!


This design is equally cute with baby blue stitching so no need to only use it for little girls!

** While not stitch-intensive the white area might make this a bit rough next to baby's skin if embroidered  directly on the onsie, that is why I did it on seperate fabric. Another way to deal with this would be to iron on some style of Cloud Cover to the inside of the onsie after doing  the embroidery to make sure it's soft next to that sweet baby skin.

Friday, January 8, 2010

Plays with Paper


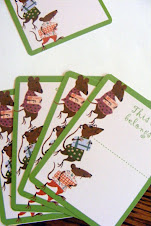
While it might be cold as all get out right now I can feel Spring just around the corner. Today's mail brought the first of what I hope to be many seed and gardening catalogs. No matter that the mail was lightly dusted with snow, I can feel Spring heading this way.  With that in mind I have designed a new hang tag for those of you who are using Lovies as part of your craft show line up. This design is as fresh as Spring and just perfect for Valentine Lovies too!

These cards come 8 to sheet in PDF format. I suggest cutting them  apart and then using a corner clipper to add a nice rounded edge. After that punch a hole and add a ribbon loop.
Remember, these tags are created as to/from cards with the hope that your customer will want to use them in that way. Your job is to put your information on the back of the tag ( create a sticker) this way your information gets seen by an even larger audience.

Thursday, January 7, 2010

Taking a peek inside my Bernina

 For those that have been plagued with stitch issues with their Bernina 830 it's a good day when things go right. These are amazing machines but they do need more dedication than other " sew & go" types of machines. 
In this photo ( click on photo to make it larger)  you can see the view of the underside of my bobbin case and the 2 prong brass stitch finger that at times can be very hard to get the thread seated in. This can be a huge cause of problems according to my Bernina tech. In the photo you can see that my thread is firmly in the fingers and also through the tension guide for the embroidery setting.  ( You can also see the fuzz in my bobbin case... get that stuff out of there!)

One thing you will also notice is how much easier it is to see that whole area  by using a bigger better mirror!.. It was also much easier to do things having two hands and not having to use that dinky little dental style mirror that they send with the machine!

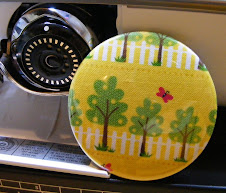
This type of mirror can be hard to find but I have a secret source.. my sons!  . They have a small business where they make event buttons, promo mirrors and the like. So they made me this swell mirror to use with my machine.  I mentioned it to another 830 owner and she wanted one right away so I thought maybe you would too! 

 The boys have made up a bunch in assorted vintage and non-vintage papers and they are all super cute! I have put them up for sale in my shop  so if you want/need  one of these handy little gems skip on over there and order one! :)

The SHOP the currently down for updating .. if you need to order some mirrors please drop us a line at maddie6@bellsouth.net and we will get you all fixed up! 


And yes... we are taking wholesale orders, just drop me a note for pricing and quantity requirements.

Tip of the week...


I bet you thought I forgot!
Have no fear, I might be running a bit late but I have not forgotten!

Today's tip has to do with keeping track of ribbon.

I have a lot of ribbon, both new and vintage, very thin and very thick. Keeping up with it and keeping it in good shape can be hard. Even more important there are some ribbons I need to keep to use as monogram strips to go on custom dog collars and leashes and I want to keep that seperate from the other ribbon.

Of course your ribbon that is still on the spool is quite easy to deal with and there are multiple products on the market to deal with keeping it in line. But when you have odd lengths off the spool that is when things tend to get a bit messy.
But never fear!.. your solution is no further away than your office drawer! Simple bulldog clips make a great way to clip shorter lengths of ribbon together and then hang them up in a tidy way. I like to separate my satins from my grosgrains, my leash and collar ribbons from my crafting supply of ribbon but you could also divide  by color or width, it's up to you!
Easy huh?

Wednesday, January 6, 2010

Dental Doings


It's amazing how much inspiration I get from life...but this time I could do with a bit less inspiration!  Took all the kids to the dentist last week to find out that  one child is ready for braces, another needs 4 teeth pulled to have room for adult teeth that are coming in. Another kid has.. get this.. 13 cavities! ( in his defense he has the most beautiful teeth but they are very tight together and have gotten micro cavities  where they touch each other that we will be treating with custom night trays of remineralizing flouride paste)  Cha-Ching!  So you can see how I could do with a bit less inspiration!

But anywhoooooo  while thinking about all things dental I was remembering early trips to the dentist with little ones, those first lost teeth and visits from the Tooth-fairy when this little guy came to mind.

I call him Toothy and he sews out in a small and large size (4x4 and 5x7 hoops).  He will be up for sale some time today and at the introductory price till the end of the weekend.


and after that.. go brush your teeth!

Tuesday, January 5, 2010

Peace, Love and Jeans

 So.. I have this pair of jeans that I have had to let down the cuffs... no I did not grow taller.. they shrunk!  ( I am the silly height between petite and average.. so sometimes I can buy petite** jeans and sometimes.. not.. or they shrink.. this time they shrank up into " high-waters")  so I have let down the cuffs and have decided to add some  great baby-cord fabric with  "hippy-flowers" on it to the cuffs.. and of course because I can't leave well enough alone, I have decided to also embellish the jeans with a whole "hippy" theme. So first step.. some designs.


For those who would like to come along on this Peace, Love and Jeans trip... please download the Peace-Flower that is Feeling Groovy and slap it on a pair of jeans that makes you feel all cool and mellow :)... as the weeks go on we will be adding more to the jeans and in the end I invite you to send me a photo of your jeans  and show them off. The best pair will win a free design collection!


** please also note that my inseam is the only petite part about me! :)

Tiny Tape Measures... sourcing


I get quite a few requests for the tapemeausres that go with this collection and have been keeping them in stock for those who need them. Well I just ran into a source where you can buy them for cheaper than I can sell them.. and since I am all about the good deal I thought I would share it with you!


Click on the tape measure deal above and it will take you to a link where they are 99 cents each!
This makes them an even better deal for making small gifts to keep ready for those times when you need a small "thank you" and a card is not quite enough!


The Tiny Tapemeasure Collection can be found here

Saturday, January 2, 2010

Welcome to My Studio


Welcome to my studio, I am so glad you have stopped by. I wish I had a bit more time to clean up before you got here but lets be honest... who really believes those shots of those perfectly clean places anyway? With the exception of shooing the cats off the worktable and moving my bottle of Green tea out of the shots these are pretty much the unvarnished truth about my studio. Is it worse at times?..yes, do I like it better when it's neat and tidy.. yes. But the creative muse often strikes at time when I have the choice to either create of clean, I choose to create :)

You will find lots of vintage goods in my studio, flaking paint and rust are beauty to me. Above you can see my vintage canisters (3 of 4) and just a sampling of my ribbon and vintage button collection.
Here is the screen fronted cabinet I use to hold the bulk of my current fabric stash. I sort of took a private pledge that I would contain my stash to this cabinet only after being at a peak overflow of 12 large plastic storage bins. Now mind you I ask that you don't look under my sewing desk or in those pink drawers since you then know all my dirty little secrets.


 A little peek at my worktable and one of my favorite storage things. It holds so much of what I reach for each day. Goodness knows it could be a lot neater but it gets the job done!


 Here you can see my serger ( up front).. the Baby ( Bernina 830) and my workhorse there in the back ( Brother pr620 6needle)  and it seems a power drill and a large cup of tea from Sam's. This table is 6 feet wide by 4 feet deep and at cutting height.  I use a drafting chair and a raised platform for the pedal of my machine.  The surface is butcher block counter top from Ikea.


On the other side of the room you will find my wrapping station. This is where I keep all my items for packaging items that I sell or give as gifts. It's chock full of cool tissue, ribbons, special boxes and what not. The cabinet is actually a kitchen unit from England with a drop down front for fixing a sandwich!


Here is one of my favorite items.. it's a vintage baby  baby scale.. Just think of all the sweet chubby babies who were weighed on this over the years! It was a very happy thrift store score.. I think I might have actually squeeled and wet my pants in excitment  then danced around holding it.. but since there is no video proof I am  not saying anything!  The scale is resting on an old metal cabinet from a very old medical practise.. I did the front door of it in a patch work of my favorite scrapbooking papers. It makes me happy each time I see it. .. to the right you can just a catch a glimps of my jewlery making bench.

And last but not least my very messy set of built ins... oh how these need a good going over.. and when I do I promise to let you see how they come out! :)


So there you go.. a small trip around my studio.. I hope you enjoyed it and come back again to see me real soon!